Friday, June 1, 2018

Compiling Ceres Solver on Windows with SuiteSparse Support

It took me a while to get all the CMake parameters just right, and a few colleagues needed to do the same. So I decided to write this document and share it with the world. Hope it helps someone, somewhere, sometime.

Environment

My building environment is as follows:
  • Windows 7 (yeah our work PCs are obsolete). But it should work on 10.
  • Visual Studio 2015, 64 bits compiler
  • CMake 3.10.3
It might work in other environments, but I haven't tested it, sorry...

Downloads

Here are the versions of Ceres and it's dependencies I used:
So download these, unzip them, and let's get to work.

Configuring and building dependencies

Eigen

Nothing to do here really, just unzip it somewhere.

gflags

  • Run CMake.
  • Set the CMAKE_INSTALL_PREFIX if you want.
  • Build and install.
The problem with gflags is that its Debug and Release targets produce the same libraries, with the exact same name, in the exact same folder. So, with the default CMAke settings, you can only have either Debug or Release, but not both.

And since both glog and ceres depend on gflags, you have to choose the same configuration for both of them. However, you might get away with compiling glog without the gflags dependency (it compiles but I haven't tested it any further).

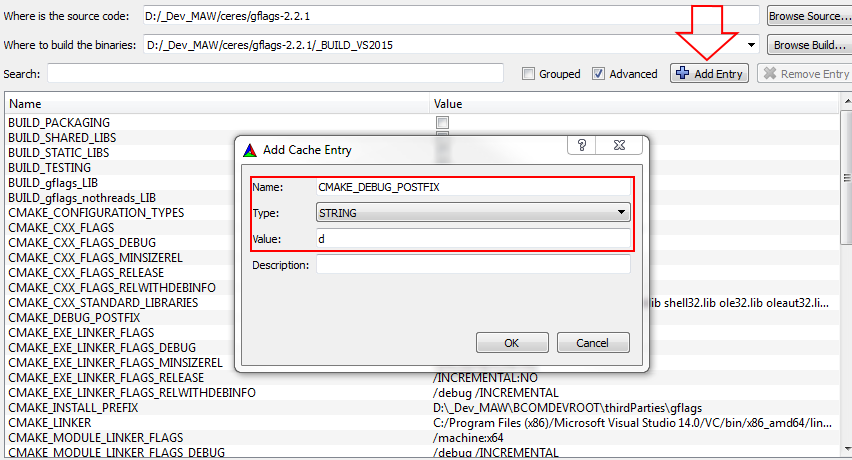
However, you can have CMake generate a Debug library with a suffix, so it will generate gflagsd.lib. To do so you just need to click on the "+Add Entry" button in your CMake GUI and create the following variable:

  • CMAKE_DEBUG_POSTFIX, Type String, Value d.

glog

  • Run CMake.
  • Set the SUITESPARSE_INSTALL_PREFIX if you want.
  • It should detect the gflags install folder automatically. If not, specify it manually.
  • Build and install.
Don't forget to build the same configuration (Debug or Release) as gflags. Or if you want to have both, just do as above and add the CMAKE_DEBUG_POSTFIX CMake variable.

SuiteSparse

If you're using Visual Studio 2013 or newer (which you should be because this guide assumes you're using VS20015), there is a problem with the declaration of rint().

Int the folder where you unzipped SuiteSparse go to the folder metis/GKlib, open the file gk_arch.h. At line 62 you should see this code block:
#ifdef __MSC__
/* MSC does not have rint() function */
#define rint(x) ((int)((x)+0.5))

Replace it with this:

#ifdef __MSC__
#if (_MSC_VER < 1800)
/* MSC does not have rint() function */
#define rint(x) ((int)((x)+0.5))  
#endif

Now you can:
  • Run CMake.
  • Set the CMAKE_INSTALL_PREFIX if you want.
  • Build and install.

Configuring and building Ceres Solver

This section assumes you will be building a Release version of ceres. For building in Debug, see section Building in Debug below.

Fire up CMake, click Configure and let's get to work.

First, we need to set up a few things for the first configuration run:
  1. Set CMAKE_INSTALL_PREFIX if you want.
  2. Set EIGEN_INCLUDE_DIR to the folder where you unzipped Eigen earlier.
  3. Make sure CUSTOM_BLAS is checked.
  4. Make sure LAPACK is checked.
  5. Make sure SUITESPARSE is checked.
  6. Click Configure.

THE CONFIGURATION WILL FAIL!

Now, before going any further, you need to check the Advanced box in the CMake GUI:

YOU NEED TO RECHECK SUITESPARSE and LAPACK BECAUSE THEY ARE AUTOMATICALLY UNCHECKED EVERY TIME CMAKE FAILS TO FIND THEM!

We now need to manually st ALL dependcies, one by one. I will be using SUITESPARSE_INSTALL_DIR to refer to the folder where you installed SuiteSparse. It should be the same value you gave CMake in SUITESPARSE_INSTALL_PREFIX when you configured and built SuiteSparse:
  1. Set AMD_INCLUDE_DIR to SUITESPARSE_INSTALL_DIR/include/suitesparse
  2. Set AMD_LIBRARY to SUITESPARSE_INSTALL_DIR/lib64/libamd.lib
  3. Set BLAS_blas_LIBRARY to SUITESPARSE_INSTALL_DIR/lib64/lapack_blas_windows/libblas.lib
  4. Set CAMD_INCLUDE_DIR to SUITESPARSE_INSTALL_DIR/include/suitesparse
  5. Set CAMD_LIBRARY to SUITESPARSE_INSTALL_DIR/lib64/libcamd.lib
  6. Set CCOLAMD_INCLUDE_DIR to SUITESPARSE_INCLUDE_DIR/include/suitesparse
  7. Set CCOLAMD_LIBRARY to SUITESPARSE_INSTALL_DIR/lib64/libccolamd.lib
  8. Set CHOLMOD_INCLUDE_DIR to SUITESPARSE_INSTALL_DIR/include/suitesparse
  9. Set CHOLMOD_LIBRARY to SUITESPARSE_INSTALL_DIR/lib64/libcholmod.lib
  10. Set COLAMD_INCLUDE_DIR to SUITESPARSE_INSTALL_DIR/include/suitesparse
  11. Set COLAMD_LIBRARY to SUITESPARSE_INSTALL_DIR/lib64/libcolamd.lib
  12. Set METIS_LIBRARY to SUITESPARSE_INSTALL_DIR/lib64/metis.lib
  13. Set SUITESPARSEQR_INCLUDE_DIR to SUITESPARSE_INSTALL_DIR/include/suitesparse
  14. Set SUITESPARSEQR_LIBRARY to SUITESPARSE_INSTALL_DIR/lib64/libspqr.lib
  15. Set SUITESPARSE_CONFIG_INCLUDE_DIR to SUITESPARSE_INSTALL_DIR/include/suitesparse
  16. Set SUITESPARSE_CONFIG_LIBRARY to SUITESPARSE_INSTALL_DIR/lib64/suitesparseconfig.lib
  17. Check CUSTOM_BLAS, if it's not already checked.
  18. Check LAPACK, if it's not already checked.
  19. Check SUITE_SPARSE, if it's not already checked.
  20. Finally, set CMAKE_BUILD_TYPE to Release.
Click Configure again. IT WILL FAIL AGAIN!

But now we can setup the final missing variables concerning Lapack.

YOU NEED TO RECHECK SUITESPARSE and LAPACK BECAUSE THEY ARE AUTOMATICALLY UNCHECKED EVERY TIME CMAKE FAILS TO FIND THEM!

  1. Set LAPACK_lapack_LIBRARY to SUITESPARSE_INSTALL_DIR/lib64/lapack_blas_windows/liblapack.lib
  2. Check LAPACK
  3. Check SUITE_SPARSE
Your final CMake options should look like this (click to enlarge and/or download full size image):

You can now build the Release version, install and enjoy!

Building in Debug

  • First you need to build gflags and glog in Debug.
  • In step 26 above, set CMAKE_BUILD_TYPE to Debug.
  • Add the suffix d to all libraries in steps, 8, 11, 13, 15, 17, 18, 20 and 22. (i.e. libamd.lib becomes libamdd.lib). Do NOT do this for BLAS and LAPACK.
  • Add the flag /bigobj to CMAKE_CXX_FLAGS_DEBUG.
Configure and build (in Debug of course).

Troubleshooting the Debug Build in your project

First, check out how to correctly use ceres with CMake on the official ceres installation page.

This works perfectly if you have either a Release build or a Debug build, but sometimes, not all the time, for some reason I cannot understand, CMake doesn't generate the proper include paths for glog and gflags for the Debug config of your project.

So you just need to simply manually add them to your CMake file, either hardcoded (which is bad, bad, bad, shame on you!) or using some kind of Environment or CMake variable (because, for another reason I don't understand GLOG_INCLUDE_DIRS and GFLAGS_INCLUDE_DIRS stay blank even though CMake finds the libraries and paths).

Here's what mine looks like:

set( INCLUDE_DIRS "$ENV{THIRD_PARTY_LIBS}/glog/include;${INCLUDE_DIRS}")
set( INCLUDE_DIRS "$ENV{THIRD_PARTY_LIBS}/gflags/include;${INCLUDE_DIRS}")

Troubleshooting

If you encounter the following errors, here's how to solve them:

Error LNK2038

gflags_static.lib(gflags.obj) : error LNK2038: mismatch detected for '_ITERATOR_DEBUG_LEVEL': value '0' doesn't match value '2' in stl_logging_unittest.obj

It's Debug/Release mismatch.It means you're trying to build glog or ceres in Debug when you compiled gflags in Release (or the opposite). You need to compile everything in either Debug or Release.

Error MSB3491

Could not write lines to file "ba_iterschur_suitesparse_clustjacobi_auto_threads_test.dir\Release\ba_iters.8A65E343.tlog\ba_iterschur_suitesparse_clustjacobi_auto_threads_test.lastbuildstate". The specified path, file name, or both are too long. The fully qualified file name must be less than 260 characters, and the directory name must be less than 248 characters.

Windows has a limit on the number of characters in a path. Try moving your ceres source files to a shallower folder with a shorter name. In my example, the source files are in D:/Dev_MAW/ceres.


Fatal Error C1128


cwisenullaryop.h(84): fatal error C1128: number of sections exceeded object file format limit: compile with /bigobj

You are building in Debug and forgot to add the /bigobj flag to CMAKE_CXX_FLAGS_DEBUG as explained in the Building in Debug section above.

Fatal Error C1083


fatal error C1083: Cannot open include file: 'glog/glog.h': No such file or directory

Try to manually add the include paths for gflags and glog as explained here.

Monday, November 13, 2017

Efficient OpenCV in Unity using direct OpenGL rendering

What this post is about

I had the need for using Unity to visualize OpenCV data efficiently, without having to break the programming of my numerous C++ DLLs. This post will explain how to share a texture handle created in Unity with your plugin DLL, allowing it to directly modify the OpenGL buffer without having to transfer or convert any image data between the C++  plugin code and Unity.

This method should theoretically work with DirectX too, but I leave the technical details to any interested parties.

Feel free to fork the code on GitHub at your leisure.

What this post isn't about

This will not be a copy/paste the code and get it working kind of deal. There is provided code, yes, but it will probably not do everything you want it to do. which is why I will be explaining the ideas and architecture behind the code, to help you better understand and change it to suit your needs.

Using OpenCV in Unity

Setting up Unity to use OpenGL

First of all you need to set up Unity to use OpenGL rendering (it uses DirectX by default). You can do this by accessing the Player Setting from Edit->Settings->Player and go to the Other Settings tab:


Just uncheck Auto Grahics API for each platform and move OpenGLCore to the top.

Creating a placeholder material

Just create an unlit texture material, it will act as a placeholder for OpenGL rendering later on. Give it a name: I called it empty for this post's purposes.


Now just create a cube and affect the empty material to it.

A look at the native plugin code

In case you haven't done it, you can get the code on GitHub. It uses a standard Unity low-level native plugin interface, which I will not explain as it is beyond the scope of this post.

The code for the DLL is in the OpenCVPlugin folder. It contains a Visual Studio 2015 solution which has to be modified to use the correct paths for your OpenCV libraries if you want to use it directly. It also uses SWIG to compile the interface between C++ and C#. More on that below.

The meat of the work is done in OpenCVDllInterface.cpp. First we need to store the handle of the texture somewhere:

void OpenCVDllInterface::setTextureHandle(void* handle)
{
 m_textureHandle = (GLuint)(size_t)handle;
}

And now that we have our texture handle, we just update it every frame with whatever OpenCV data we want:

void OpenCVDllInterface::updateFrameDataOGL(int eventID)
{
 if (m_captureDevice.isOpened())
 {
  cv::Mat originalFrame;
  m_captureDevice >> originalFrame;

  if (!originalFrame.empty())
  {
   cv::Mat frame;

   flip(originalFrame, frame, 0);

   size_t currentFrameSize = frame.total() * 3;

   if (m_frameBufferSize < currentFrameSize)
   {
    m_frameBufferSize = currentFrameSize;
    m_frameBuffer = (uchar*)realloc(m_frameBuffer, m_frameBufferSize);
   }

   Mat continuousRGB(frame.size(), CV_8UC4, m_frameBuffer);
   cvtColor(frame, continuousRGB, CV_BGR2RGB, 3);

   glBindTexture(GL_TEXTURE_2D, m_textureHandle);

   glTexParameteri(GL_TEXTURE_2D, GL_TEXTURE_MIN_FILTER, GL_NEAREST);
   glTexParameteri(GL_TEXTURE_2D, GL_TEXTURE_MAG_FILTER, GL_LINEAR);

   // Set texture clamping method
   glTexParameteri(GL_TEXTURE_2D, GL_TEXTURE_WRAP_S, GL_CLAMP);
   glTexParameteri(GL_TEXTURE_2D, GL_TEXTURE_WRAP_T, GL_CLAMP);

   //set length of one complete row in data (doesn't need to equal image.cols)
   glPixelStorei(GL_UNPACK_ROW_LENGTH, (int)(frame.step / frame.elemSize()));

   glTexSubImage2D(GL_TEXTURE_2D,
    0,
    0,
    0,
    continuousRGB.size().width,
    continuousRGB.size().height,
    GL_RGB,
    GL_UNSIGNED_BYTE,
    continuousRGB.data);
  }
 }
}

This code just directly outputs the video capture device but it can easily be adapted to display any image manipulations OpenCV can store in a cv::Mat.

And finally, a method to inform Unity of the size of the texture we will need it to create:

void OpenCVDllInterface::getFrameBufferInfo(FrameInfo& bufferInfo)
{
 if (m_captureDevice.isOpened())
 {
  bufferInfo.width = int(m_captureDevice.get(CAP_PROP_FRAME_WIDTH));
  bufferInfo.height = int(m_captureDevice.get(CAP_PROP_FRAME_HEIGHT));

  cv::Mat frame;
  m_captureDevice >> frame;
  if (frame.empty())
  {
   bufferInfo.sizeInBytes = 0;
  }
  else
  {
   bufferInfo.sizeInBytes = unsigned int(frame.total() * 3);
  }
 }
}

This assumes RGB byte sized data (hence the *3 to compute buffer size) and has to be adapted to your own needs.

Scripting in Unity

The Unity project is located in the OpenCVUnityProject folder. Let's take a look at the OpenCVBridge.cs script in the Assets/Scripts folder.

On Start(), we need to ask the DLL, about the texture we need to create, create said texture, and pass it on to the DLL. We also need to setup an event callback to trigger the OpenGL update from within the DLL using a delegate function in a coroutine:

IEnumerator Start() {
        m_dllInterface = new OpenCVDllInterface();
        m_frameInfo = new OpenCVDllInterface.FrameInfo();

        m_eventCallback = new eventCallbackDelegate(m_dllInterface.updateFrameDataOGL);

        m_dllInterface.getFrameBufferInfo(m_frameInfo);


        m_texture = new Texture2D(m_frameInfo.width, m_frameInfo.height, TextureFormat.RGB24, false);
        m_texture.filterMode = FilterMode.Point;
        m_texture.Apply();
        m_material.mainTexture = m_texture;

        m_dllInterface.setTextureHandle(m_texture.GetNativeTexturePtr());

        yield return StartCoroutine("CallPluginAtEndOfFrames");
    }


And the coroutine itself is pretty straightforward. Just call the correct method in the DLL:

private IEnumerator CallPluginAtEndOfFrames()
    {
        if (m_eventCallback != null)
        {
            while (m_dllInterface != null)
            {
                yield return null;

                GL.IssuePluginEvent(Marshal.GetFunctionPointerForDelegate(m_eventCallback), 1);
            }
        }
    } 


Now just attach the script to the cube we created earlier, you know, the one with the empty material. And don' forget to affect the empty material to the script.

Communicating between C++ and C#

Usually when communicating between C++ and C# there's a whole slew of manual dllimport directives and other hassles. But luckily, you can avoid all this if you use SWIG. I will definitely not go into the details of SWIG so feel free to browse their website for more information.

The Visual Studio solution on GitHub is already configured to automatically run SWIG and compile its output. If you wan to know how that is done, you can check out this page on Stackoverflow. It describes the process for Python but is easily modifiable for C#.

The SWIG interface file is pretty straightforward, you can find it in the OpenCVPlugin/Sources folder:

%module OpenCVPlugin

%{
#include "OpenCVDllInterface.h"
%}

//Use System.IntPtr from C# for void* pointers
%typemap( cstype ) void* "System.IntPtr"
%typemap( csin ) void* %{ $csinput %}
%typemap( imtype ) void* "System.IntPtr"

%include "OpenCVDllInterface.h"

The file is pretty straightforward. The only code gymnastics here instruct SWIG to user C# System.IntPtr when it encouters void* in C++.

Putting it all together

Before compiling your DLL make sure you use the same architecture as your Unity editor: a 64-bit Unity Editor will only work with a 64-bit DLL plugin.

When you compile your C++ project, SWIG will create .cs C# script files in the same folder as your DLL. If it's not already there, create the Assets/Plugins folder in your Unity project and copy the DLL and the generated scripts.

Run it and enjoy!

Using a canvas for AR applications

For real AR applications, displaying the OpenCV video feed on a cube is not the best approach. What can be done is assign the empty material to a Unity canvas that is attached to the main camera, with coordinates in camera space, set at a distance a little below the camera's far plane. The canvas aspect ratio should match the OpenCV video aspect ratio.

With that, you should be golden.

Tuesday, June 21, 2016

Why I'm glad I paid for the Vive even though I had the Rift for free


I'd been aching for a while do dish out and buy the HTC Vive, even though I had the Oculus Rift for free as a gift for Kickstarting them way back when. And after reading Brian Hart's post, I felt less crazy in the head and went and indulged myself. And I don't regret that decision one bit. The more I play around with both headsets, the more I like the Vive better. Everything about it is designed around the user experience.

I'm not talking specs, latency, FOV or other crap, both headsets each have their good and bad points but are mostly the same and you can find tons of breakdowns on the web.

No, I'm talking why me, as an end user, feel more comfortable using the HTC Vive.

The Hardware

Setting up the Rift

I don't know why the Oculus Rift specifications ask for 3 USB3 ports, you only need two of them. It probably will need an extra port when Oculus Touch ships out, for the second tracking camera (but that's just speculation on my part). So move your computer out of it's cozy spot under your desk, plug in the tracker (1 USB3 port) and the headset (1 USB3 and 1 HDMI ports) and you're good to go.

Since the Rift is not designed for room scale VR, all the elements are on your desk or thereabouts, linked directly to your PC. It makes setting up the hardware less of a hassle than the Vive.

Setting up the Vive

The Vive is designed for room scale VR so the lighthouse trackers need to be placed far apart to define your play area, away from your computer. So you can't plug them into your PC. Each tracker needs to be plugged into a wall socket, so, depending on how your room is set up, you might have a bit of trouble plugging them in without wires running all over the place.

The trusty link box.
The headset doesn't plug directly into your PC, instead, you connect a small link box to your PC and to yet another wall socket (Power In, USB3 and HDMI) and the headset plugs into that. This might seem like a hassle, but when you realize that your secondary screen and the Oculus Rift both work with the link box, you don't have to move your PC whenever you need to switch between your headsets and your screen! 

First blood

And that link box right there is the first point the Vive scores for user friendliness. And here is where Oculus shoot themselves in the foot because they had that link box in DK1 but they removed it for DK2 and onward. Dunno why.

So now I keep the Vive link box plugged in and use it to switch between headsets and my secondary screen.

But what about the ears?

VR is not only about tricking your eyes, you also need good sound for better immersion. Both headsets have great audio quality, but the hardware is clunky in both cases.

The Rift has open on-ear headphones, directly linked to the headset on small swivels. They come wrapped in that black moss that has a tendency to dry up over the years and fall apart in dusty crumbs. Not a big fan. Furthermore, I have long hair and, whenever I remove the headset, the headphones tend to get tangled in my hair making the operation painful and complicated. 


The Vive doesn't fare much better, in my opinion. They provide earbuds that keep falling out of my ears either because I have weird ear canals, or because my ponytail tugs on the too short cable of the earphones.

Not convinced by either headset, Oculus' is clunky, and Vive's flimsy.

But you don't have to stick with the crappy Vive earbuds as you can plugin whatever earphone/headphone you want! Yes! You can use your favorite listening device, as long as it has a jack plug. So all those audio purists out there who prefer open/closed/intra-aural/extra-aural/whatever headphones, you don't have to compromise.

In what world is that not a good design decision?

A foggy notion

The Oculus Rift hugs the face comfortably, giving you a wide (almost) unobstructed view of the VR world, which is very good. But the drawback is that the lenses keep fogging up, sometimes in as fast as 30 seconds and I have to keep removing the headset to wipe them off. 

The Vive fells a bit clunkier, a bit heavier heavier on the nose and has a smaller view window, but it doesn't fog up.

Could we get the best of both worlds please?

The Software

Installing Oculus Home

First you have to find the installer. There is no direct link on the Oculus website and you either have to go to the Support page to finally find it, or manually enter the URL conveniently printed on the inside of your Oculus Rift box. Why?! Is it too much to ask for a link to the Oculus Rift software when I go to the Oculus Rift homepage?!

And if you're not an English speaker, it's written right there in the fine print!

Installing SteamVR

Steam:"I just noticed you plugged your Vive in, would you like me to install SteamVR for you?" 
Me: "Yes please!" 

Done.

A tall tale

Another thing I find weird (and even just wrong) about the Oculus Rift is that it asks for your height during setup. I'm 1.98m tall (that's 6ft6 for the metric challenged out there) so I entered that. Later, when a friend was trying out Valkyrie, he told me he felt weird having his hands so far away from his body and felt taller than usual. It seems to me the Rift saves your height somewhere and applies it everywhere as an offset? In what world is that a good design?!

On the other hand, the Vive asks you where your floor is, and sets it as its zero position. So when I'm standing, it knows I'm 1.98m and that my friend isn't because it knows how far away from zero the headset is. This is so much more elegant and makes so much more sense. 

Yet another "small thing" that shows the Vive people put more thought into their product.

Inside Oculus Home

Hey! Listen!

The first thing you see when you put on your Oculus Rift is a disclaimer warning you about VR sickness, being careful about your surroundings, etc. You have to acknowledge it by either clicking a button or staring at it really hard until it goes away. The thing is, you will see this every single time you restart Oculus Home! It's not that big of a deal, but it irks me.

Your PC is a worthless piece of sh*t

The disclaimer and the omnipresent guilt trip text box.
The first time you run Oculus Home, you get treated to a few VR cinematic sequences that are kinda cool, but, I dunno, they lack panache. No interaction, nothing much besides just sitting there, looking around and going "wow"! The novelty wears off pretty fast though...

Anyway, now you're inside Oculus Home, which is adequately a representation of a living room. A living room with a soothing fire, a bubbling brook and huge glass pane windows that let you see the trees outside. It's nice, cozy, some books lying around. Oh, and a pain in the ass text window that follows you everywhere claiming that your PC is not up to spec (I have a 960GTX where the minimal specs require a 970GTX but I haven't had any problems whatsoever with any of the games I tried, including Valkyrie). So yeah a nice big square of text that follows you everywhere, that you can't dismiss, telling you your PC is crap. Guilt trip much?

Go out and play!

Whatever, I ignore it and start downloading a game. It downloads in the background while I look around Oculus Home. There's not much to do besides browse the application catalog or my nonexistent friends list. But hey, that's not what it's here for.

When the download's done... I need to remove my headset, go to the desktop, and allow the application to finish installing extra stuff.... Way to break immersion Oculus. Thank you.

Inside Steam VR

Welcome to your own personal wasteland

The Vive Home Wasteland
The first time you fire things up, you go through an interactive tutorial with Wheatley which is kinda fun and helluva more entertaining than just sitting around looking at stuff.

And then you're dropped into a vast black waste with nothing in sight: Steam VR home. A bleak dark desolate place to say the least. Yeah, the Vive definitely looses points on this one...

...but you can customize this desolate wasteland and make it your own. I took me some digging to figure that out, but you can transform that poor dark desolate emptiness to look like anything you want (or just download skins other people spent time making). It takes a lot of effort to create custom skins, but the Workshop has some pretty cool stuff to download for free (Holodeck anyone?).

...but you can never leave!

Desktopception: My desktop showing Vive Home showing my desktop...
Everything with the Vive software is thought and designed to keep you in VR, or at least keeping your headset on.

No need to remove the headset and go to your Desktop to install stuff.

But if you do need to go to your Desktop for whatever reason, you can do it from the comfort of your own wasteland. You can bring up a window, in VR, containing your Desktop and use it as if your VR wand was a mouse. Granted, if you need to type some text, you're better off going to the real thing and using your keyboard, but it's a cool feature when you need to read that email you were waiting for or refresh your blog page hits to see if anyone is reading you.

Knock knock!

Another cool "little thing" is the "Knock Knock" feature. If you activate it, a small window appears on your Desktop and when someone clicks on it, it sends you a notification, in VR, saying that your attention is needed in the real world. This is definitely better than having the crap scared out of you by someone poking you in the ribs. And it is also safer for that person not to get near you if you're flailing around trying to bludgeon a Zombie to death.

Knock knock!

Who's there?

And yet another "little thing": you don't even have to remove your headset to see the real world. Just double click on the menu button and you can see an outline of the real world through the front facing camera. A very handy feature when you want to get your bearings.

You need to activate that feature first though, it's not on by default.

Room view might not look like much, but it's more than enough to get your bearings.

Come in we're Open

One of my biggest beefs with Oculus is that their platform is completely closed. You can only use the Oculus Rift with the stuff you buy in their shop. They use DRM to protect their software and they still haven't understood that, not only is that the wrong way to go, but that it's also completely useless.

The Vive, on the other hand, uses OpenVR and/or SteamVR which are both headset agnostic: you can use whichever headset you prefer. So yes, you can play SteamVR games with your Oculus headset.

If you want VR to succeed and bring it to the masses, openness is the way to go. Tell me which one is friendlier:

Steam: "Everyone is welcome! What? You're with the competition? Who cares, come and play with us!"
Oculus: "You don't have our exclusive encrypted DRM protected VIP pass? We don't care about you. Go away!"

Yeah, I thought so.

Here's our sampler buffet, indulge

Both headsets have free samplers to show you what VR is about.

Oculus have a few  "made for VR" movies, some of which are not exclusive to the platform like The Rose and I or Colosse, which are also available for the Vive. It's just like watching a movie, but in VR which means you sit on your ass watching a story, but you get to choose what to look at instead of having a fixed camera.

But we want more, we want games, so show us what VR can do!

Oculus has two free games to give you a taste of what VR is all about. Farlands is a charming game where you stand around on alien worlds, watching cute little alien lifeforms running around. You can feed them and take pictures of them and... um... that's basically it. Fun for a few minutes, but it gets boring very fast. Let's look at the second game then, Lucky's Tale: a third person 3D platformer that has absolutely nothing to do with VR. You control a cute little fox with your joypad, and you run, jump, stomp and coin collect your way through easy, cute, eye wateringly colorful levels.

Watch weird alien fauna in Farlands or jump your way through Lucky's Tale on the Oculus Rift.

Granted, the Oculus touch isn't out yet, but I'm sure VR can give us better than Tamagotchi and Mario ripoffs! Let's go next door to try Vive's sampler.

The Vive's "free demo" game is called The Lab. It features eight different mini games ranging from contemplating serene VR postcards with your trusty fetch-a-stick robodog, to a nerve wracking tower defense game where you have to shoot your bow and arrow on growing waves of invaders. It shows a wide panel of what can be done in VR, from serious, to contemplative, to action packed, to quirky. It's a great sampler and a fun game in it's own right (even if some of the mini games do get boring after a while).
Repairing an Aperture robot in Vive's "The Lab".


That's all folks!

If I had to guess, I'd say Oculus felt threatened when the HTC Vive was released and they rushed their own release. The Oculus user experience is miles from OK in my book, and they still haven't set a date for the release of Oculus Touch.

With that said, if you reread my rant above, you'll notice that most of the problems that bother me with the Rift are software based, and can be corrected if Oculus wants to improve on their user experience. 

I feel like HTC Vive hit the ground running, and Oculus is just barely learning to walk. I just hope that when both find their stride, we'll all be able to enjoy awesome VR regardless of the hardware we have. 

I definitely would not want a VR war similar to the console war, but it seems to me that's where Oculus is unfortunately heading.